How To Fix “DNS_Probe_Started” In Google Chrome?
Are you getting the “DNS_probe_started” error in your Google Chrome? Well, this error appears when your browser is facing Domain Name Server (DNS) problems. Do you know How to Fix “DNS_probe_started” in Google Chrome? No? Ok no worries. We are here to help you out.
You may get this DNS_probe_started error at times in your Google Chrome. This error may also occur when you visit any specific internet site. This error message is related to a network issue. However, this problem is linked with the misconfiguration of DNS settings or any other issues with the internet settings.
If you are looking for ways on How to Fix “DNS_probe_started” in Google Chrome, then you have come to the right place, there are a few ways by which you can fix this issue. You can relaunch your Google Chrome, you can try to change the ipv4/ipvb6 DNS address. You can even try to uninstall and then install the network driver again.
The detailed fixes have been listed. All you gotta do is scroll down a bit and read them in detail. Are you ready for it? Let’s get started.
How To Fix “DNS_Probe_Started” In Google Chrome?
Well, here we have discussed a few steps that will help you to know How to Fix “DNS_probe_started” in Google Chrome. These steps are easy to follow and you will be able to fix them in a snap.
1. Relaunch Google Chrome
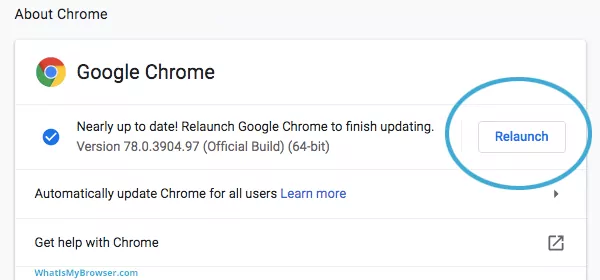
When you relaunch your Chrome browser it will help you to fix many issues in the browser which also includes the DNS probe started error. It is really easy to use these steps and you will surely face no difficulty while following this step.
Ensure that you have saved all your unsaved work before you reopen the browser. Now, close the browser by choosing the X icon which you will find in the upper right-hand side corner of the screen. Now, relaunch Chrome by double-clicking the browser icon on your toolbar or desktop. If you don’t have the shortcut, then you can open the start menu and search and then launch the browser. Enter your sites and Chrome will open them without any issues.
Related: How To Use Enhanced Google Chrome Safety Mode?
2. Change Your Ipv4/Ipvb6 DNS Address
Here are a few steps that will help you to change your ipv4/ipv6 DNS address.
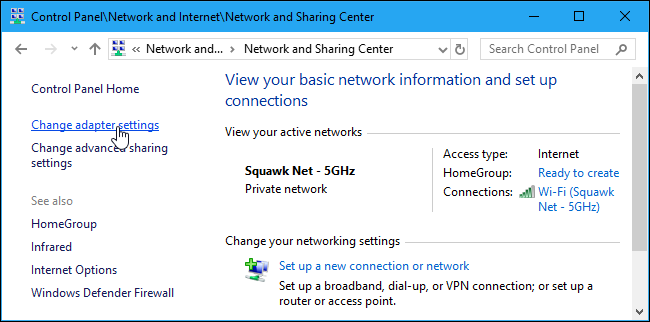
- First tap on the windows + S button. Search for the control panel and click on it.
- Choose network and sharing center.
- Tap on the change adapter settings.
- Now, you will be directed to all your network connections. Choose the particular connection that you want to configure the public DNS.
- To change your Wi-Fi connection, you just have to right-click and then choose the properties.
- You will get to see a dialog box. When you scroll down you will get to see the internet protocol version 4 and internet protocol version 6. Tap on any of them and choose the properties.
- Now, on the next page ensure that you have checked Obtain DNS server address automatically and obtain a new IP address automatically.
- Lastly, restart your computer and the changes will get saved.
3. Uninstall And Reinstall The Network Driver
The next method that you can try is to uninstall and install the network river again. Here’s how you can do it:
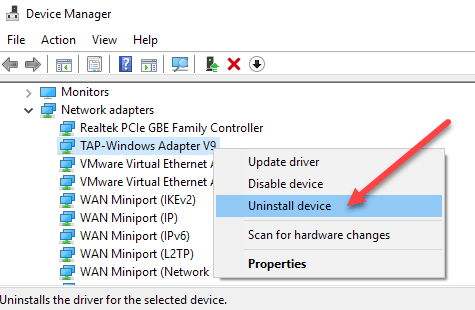
- First, uninstall the current network driver of your computer.
- Now, click on the windows key + X on your keyboard.
- Choose the device manager on the list.
- Look for the specific network adapter or driver from the device list. Now, choose the specific device and then, right-click and uninstall it.
- When the driver has been uninstalled, restart your computer.
- Now, install a new network driver on the basis of your device.
4. Change Your PC’s DNS Server
Your web browser including Chrome uses your DNS server so that it can reach your site’s IP addresses. If your DNS server experiences issues in which your browser is not able to resolve domain names and in turn shows display errors.
You can fix the DNS probe started error in your Chrome by changing the DNS server. Here are a few steps that you need to follow to do so:
- Open your setting and then select network and internet. Now, choose change adapter options.
- Now, right-click on your network adapter and choose the properties from the menu.
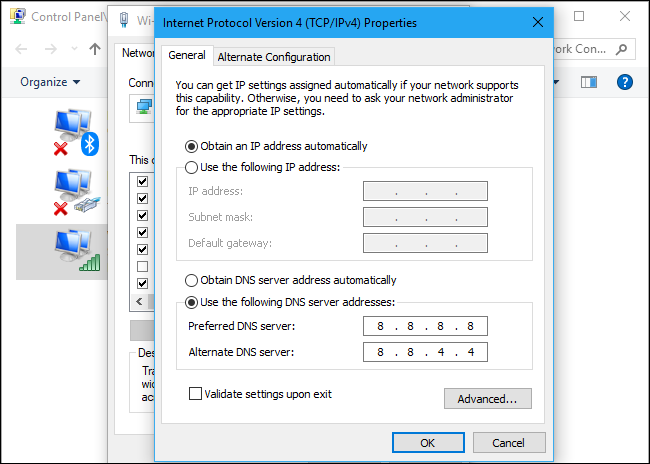
- Next, you gave to select the internet protocol version 4 followed by properties.
- Turn on the option that says Use the following DNS server addresses.
- To use Google’s public DNS you need to enter 8.8.8.8 in the Preferred DNS server field and 8.8.4.4 in the Alternate DNS server field.
- If you want to use the DNS of Cloudflare you need to type 1.1.1.1 in the Preferred DNS server field and then 1.0.0.1 in the Alternate DNS server field.
- Choose OK to save the changes.
5. Disable The Antivirus And Firewall
You can try to disable the antivirus and firewall in order to Fix the “DNS_probe_started” error in Google Chrome. Here’s how to do it:
- Open the start menu and search for windows security. Select this option in the search results.
- Choose virus and threat protection on the left-hand side and then, click on manage settings on the right side of the screen.
- Turn off the real-time protection option.
- Select Firewall and network protection which you will find in the left sidebar.
- Choose domain network and disable the Microsoft defender firewall option. Repeat this step for both the private as well as public network options.
- Lastly, open Chrome and load your sites.
Wrapping Up:
So, this is How to Fix “DNS_probe_started” in Google Chrome. The steps are really easy. All you have to do is follow the steps as it is and, in a snap, you will fix this error message. If you have any questions, then you can reach us in the comment section below.
Frequently Asked Questions
Q. Will Restarting Your Router Help Fix The Issue?
Well, the browser issues are often related to your router, make sure that your router is working properly. If you see that your router has some glitches then you can reboot your device and this should fix your issue.
Q. Will Using Internet Connections Troubleshooter Help Fix The Issue?
You can try to use the internet connection troubleshooter. Here’s how to do it:
- Press the windows + I key to Launch settings.
- Select the update and security option followed by the troubleshooting option. Now, choose additional troubleshooters in the settings
- Choose internet connection and then select run the troubleshooter.
- Your troubleshooter will open. Now, find the issues with your internet connection.